There are many advantages to using a coved (concave curved) backsplash compared to a straight (right-angled) backsplash. One major advantage is ease of cleaning. A coved splash allows for easy access and removal of crumbs and dirt, whereas crumbs and dirt collect in the right-angle corners when a countertop joins a traditional, straight backsplash. Another advantage is the smooth integrated look that the countertop has with a coved backsplash. Fabrication of a coved backsplash is depicted below. (Note: measurements do not need to be exactly as presented. However, if you vary any one dimension, make sure to compensate in the corresponding dimension.)
Handy tip: Carry out the procedures below on a piece of scrap prior to doing the final cutting and fitting for the countertop.
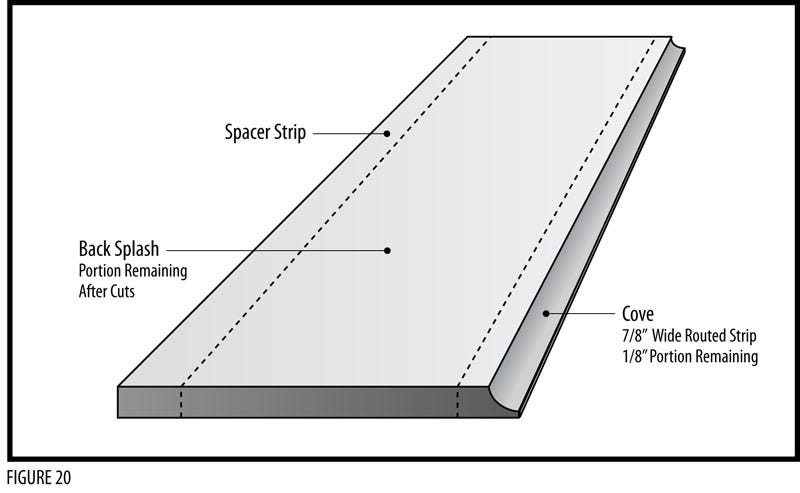
In order to create a 4” high backsplash, you will need a 6” wide strip of solid surface material that is the length of the countertop. Using a 3/8” cove bit in the router, make two passes and remove a coved portion of the 6” wide piece along the edge. This will become the cove piece. Be sure that 1/8” is left at the bottom of the piece.

Figure 20: Creating Parts of the Coved Backsplash
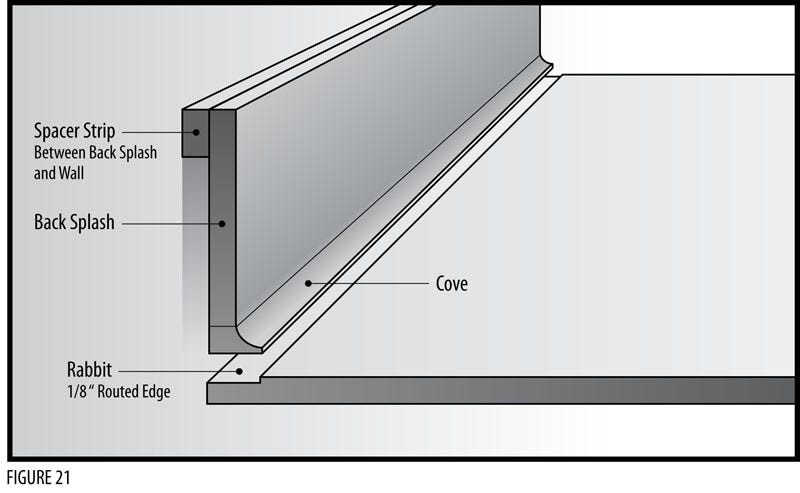
Cut away the coved portion and the portion on the other side of the 6” strip that will become the spacer strip between the backsplash and the wall (see Figure 20 above.) The cove strip should be approximately 7/8” wide so it can be glued to the remaining 5” backsplash piece to form the splash piece (see Figure 21 below.)

Figure 21: Creating Parts of the Coved Backsplash
Next, cut the rabbet (notch) in the countertop with dimensions that will allow the cove strip to fit tight. The depth of the rabbet should be a bit less than the 1/8” (approximate) edge of the cove strip. When it comes time to sand the cove area, if the edge of the cove strip is flush or slightly above the countertop then sanding will be easier and a dip in the surface of the top will be avoided.
Scuff the mating surfaces of the backsplash and cove pieces, wipe with denatured alcohol and lay them on their backsides. Apply adhesive and clamp the two pieces together.
After the adhesive hardens, leave the joined piece on its backside and sand away the excess adhesive to even out the seam. You can use a dowel, or other long, round object, with 120-grit or 180-grit sandpaper wrapped around it to sand away the squeezed-out adhesive. Follow this rough sanding with a random orbit sander equipped with a soft interface pad. This pad will contour to the cove area and make sanding easier.
Glue the spacer piece, that was cut away from the backsplash, to the backside of the splash piece at its top. If you want, you can now rout a round over edge to this piece. To do this, use a cove bit with the chosen radius and a bearing at the bottom.
To glue the splash squarely to the top, make blocks that are about 1” thick and 4” square with one corner cut away (see the Inset on Figure 22). Attach the blocks to the countertop with hot melt glue at about 12” intervals. Make sure to dry fit and space them correctly so the splash can be clamped in its final position once the glue is applied.

Figure 22: Gluing the Coved Backsplash
Scratch the mating surfaces of the bottom edge of the backsplash and the rabbet and clean with denatured alcohol. Apply the adhesive with a 1/8” bead in the front corner of the rabbet and another larger bead about 1/4” from the back. Set the front edge of the splash into the front seam adhesive so a small amount spreads and squeezes out the top of the joint.
Clamp the backsplash piece with bar clamps in both a vertical and horizontal direction to create a solid joint. Repeat the sanding procedure set out above, where the backsplash was glued to the cove piece. Now that the cove is completed, sand again with a random orbit sander with the soft interface pad in place.
