Building up the edges in the front and ends provides the appearance of a thicker countertop without all the weight. This is not difficult to accomplish and will provide a significant savings in costs of material.
Sheets of solid surface material are typically available in 30” wide by 144” long sheets. Some brands have 36” wide by 120” long sheets available. Since a standard countertop is 25” deep, there is enough material to make a 3” back splash and almost two 1” strips for the dropped edge, from a 30” wide sheet. (An inch allows for the width of the saw cut, otherwise known as a kerf.)
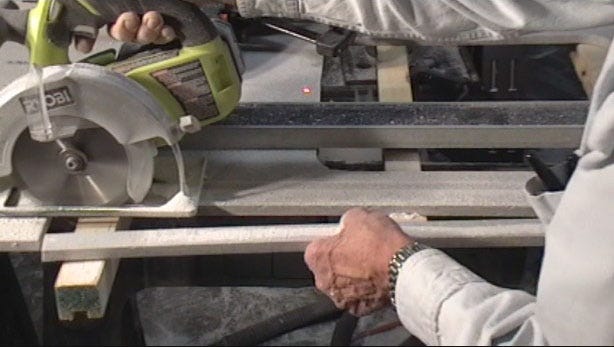
Cut the 1” strips and the strip for the backsplash from the edge of the sheet. When the sheet is part of an inside corner, you can take the two 1” strips from the area that is cut away from the inside radius corner (See Photo 10 below.)

Photo 10: Cutting a Strip for a Dropped Edge
Lightly sand the top and bottom of one of the edge strips, and the top of the other strip, with 120-grit sandpaper. Also, sand the underside of the countertop where the edge strip is to be attached. Lastly, clean all the surfaces that will receive adhesive with denatured alcohol.
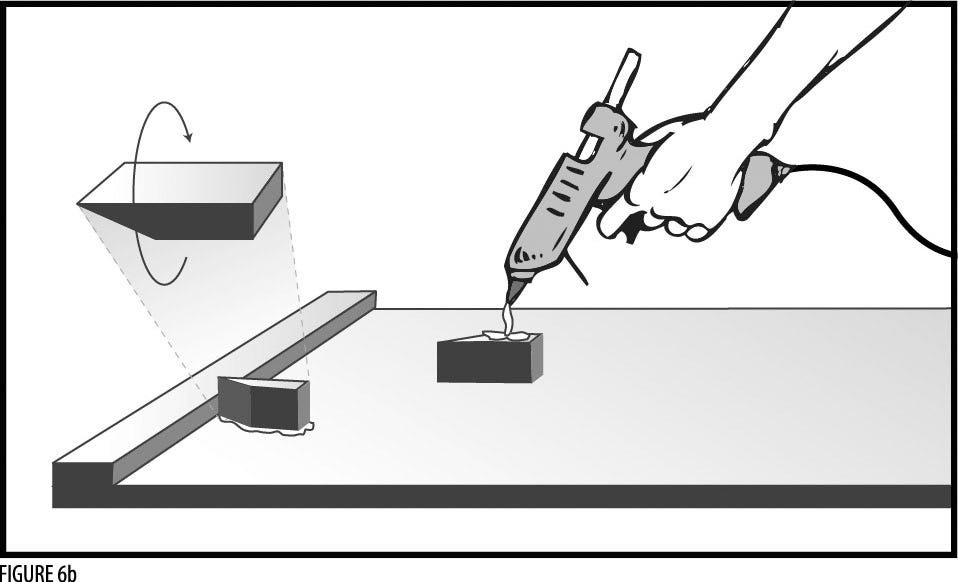
Dry fit the strips and attach the guide blocks with hot melt adhesive, as shown in Figure 6.

Figure 6: Dropped Edge Placement with Backing Blocks
Apply 2 beads of adhesive toward the front of the first strip. Clamp with spring clamps about every 5 to 6 inches, while making sure the adhesive runs out the front side (See Figure 7 and Photo 11 below.) Let the adhesive set for approximately 30 minutes and then follow the same procedure for the second strip. Once you have glued several strips into place, you may want to speed up the process by applying both strips at the same time.

Figure 7: Clamping Dropped Edge Strips

Photo 11: Clamping the Dropped Edge Strips in Place to Dry
Handy tip: position the spring clamp jaws so that the lower jaw is further away from the front edge than the upper jaw. This will cause the material to slide toward the backing blocks where it should be.
Inside Corners Procedure
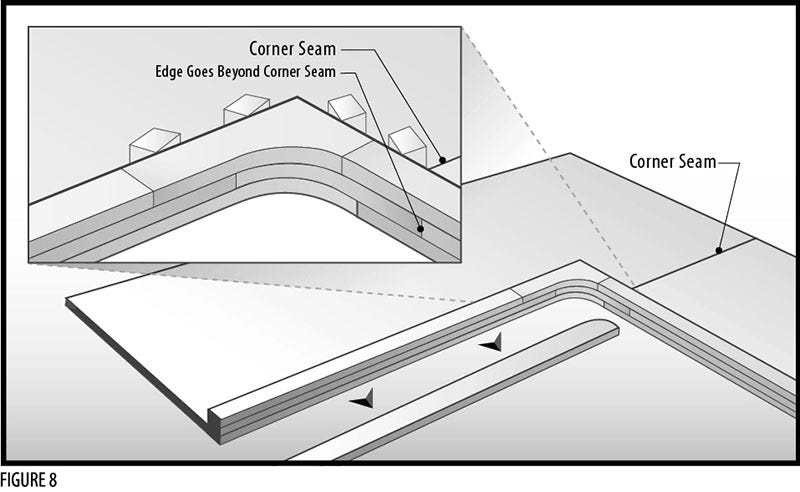
Inside corners should have a radius of ½” or larger; the larger the better from the standpoint of strength, crack prevention, and visual appeal. The start for creating the inside corner began in an earlier step when the sheets were laid out in preparation for seaming and edge build-up. (See Figure 8 below.)
The inside corner procedure is a continuation of edge build-up. Continue the build-up around the corner so as to maximize strength and crack resistance. The first layer of build-up must encompass the radius as well as extend beyond the corner seam.
The second layer functions in the same way, but in the opposite direction. (See Figure 8 below.) Notice that the alignment blocks are rotated so only the edge touches the strip. This keeps the block from sticking to the adhesive squeeze-out. See the chisel pointed blocks in Figure 7 for alignment blocks that come in contact even less than these.

Figure 8:Layout of Sheets for Corner Seam Location and Edge Build-up
Start the next step of routing the inside corner and remaining edges once the build-up adhesive has set. Using a template (as shown in Figure 9), rout the inside radius using a straight carbide router bit with a pattern bearing at the top.
Continue with the rest of the edge routing with either straight templates, like the corner template, or run the router against a fence. Obviously, whichever approach is used, take care to avoid any routing rough spots caused by template misalignment.
Once the edge has been routed with the straight bit, then a profile bit can be used to complete the edge treatment. This bit often has a bearing at the bottom and will run against the flat surface created by the straight bit.

Figure 9: Route the Corner using a Template
Outside Corners Procedure
Like inside corners, outside corners should have a radius. However, outside corners should be rounded so they do not injure someone that may bump into them and for aesthetics. The degree of the radius is dependent on where the corner is located. If it is next to a free standing range and does not protrude, then the outside corner can be only slightly radiused. If it is the corner of an island, then the radius should be large enough to minimize the damage done when someone runs into it.
Also, like the inside corner, if the outside radius is larger than 1/8th”, then it should be cut using a template.
